Terminal Settings

Terminal Settings
When you open a Terminal’s settings page, there are several different tabs you can use to configure the device settings. They are as follows:
· Overview allows you to view and manage the Terminal’s basic details.
· Engineer PIN allows you to view and reset the Engineer PIN used to link a Terminal with Device and Access Manager.
· Device is a place where you can remotely change the physical settings of the Terminal, like the LED settings.
· Firmware displays information on the current firmware of the Terminal (firmware is the software installed the device, like a mobile device's operating system)
· Fingerprint allows you to alter how Users can clock using their fingerprint.
· Prox device allows you to alter how Users can clock using proximity devices.
· Faceprint allows you to alter how Users can clock using facial recognition.
· View status provides information around the device status.
1.1 Overview
You can change several different details about the Terminal on the Overview tab.
· Terminal name allows you to change the name of the Terminal.
· Displayed under the Terminal name is the Terminal’s serial number.
· Timezone allows you to choose what Timezone the Terminal should use.
· Log level provides several different levels of detail for your Terminal's log. Generally, this should be set to Error so you can view error logs but calls with Support may ask you to change this setting.
· Accepted authentication methods allows you to select which Authentication methods will be accepted. You can click each option to turn it on or off. An option highlighted in blue means it will be accepted.
· Note: The Terminal's accepted authentication methods will override any preferences for the User. If a User can only clock using a fingerprint, but the Terminal does not accept fingerprints, they will not be able to clock.
1.2 Engineer PIN
Engineer PIN displays the unique access code used by engineers who need to access the physical Terminal. They are used to connect the 'digital' Terminal on Device and Access Manager with the physical Terminal on your site. You can reset the pin by clicking the refresh button. These Engineer PINs will remain valid for one month, after which they will need to be refreshed.
1.3 Device Settings
The Device settings allow you to change the settings of the Terminal that can usually be altered on the physical device.
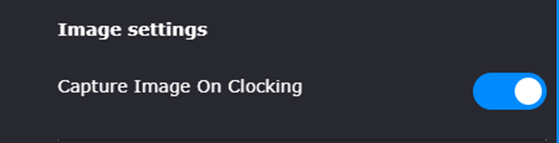
Image settings allows users to select the option to capture the image of the person making a clocking at a terminal.
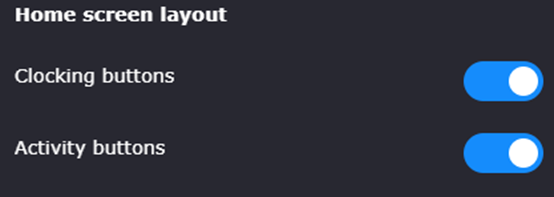
Home Screen Layout allows users to select between clocking or change activity buttons to be displayed on the device home screen. Both settings can be set by using the settings shown below, please note that at least one setting will be required either clocking or activity buttons.
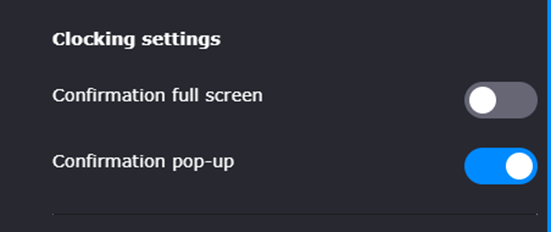
The Clocking settings allows you to choose either a full screen confirmation message or a pop-up message when a clocking is made on the terminal.
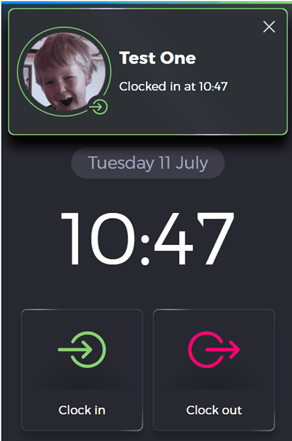
Example of a pop-up message
Use the switch to turn the T2’s LED lighting on and off and use the slider (or text box) to change the Terminal’s volume between off (0) and high (100).
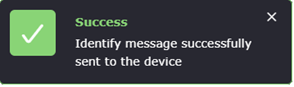
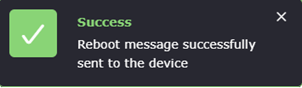
Terminal Actions will allow users to either locate a terminal or restart a terminal directly from the Device and Access manager portal.
Press to Locate Terminal – once selected the following message(s) will be presented:
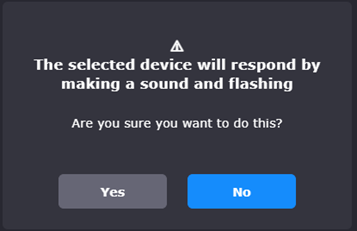
Press to Restart Terminal – once selected the following message(s) will be presented:

You can also turn the ability to use a proximity reader on or off using the switch.
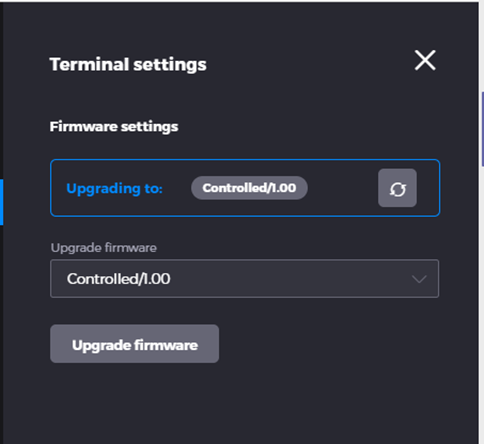
1.4 Firmware Settings
Firmware settings is a tab where you can upgrade the Firmware of the Terminal. Firmware is the software installed on the Terminal, so like the operating system of your computer or mobile device.
To upgrade the Firmware, select the build you wish to upgrade to from the drop-down menu, and click Upgrade firmware. Once a Terminal has downloaded and installed the Firmware, there will be a brief period where the Terminal will restart, and it will not be usable.
1.5 Fingerprint Settings
There are several different settings you can alter on the Fingerprint tab:
- Auto-detect clocking direction is a toggle that allows you to enable the T2 making assumptions on which way the User is clocking. For example, if their last clocking was a clock in, the T2 will assume the User is clocking out next time they scan their fingerprint. Enabling this setting means the User can clock with just a single touch.
- Security Level - Use the slider (or text box) to change the Terminal’s security level between Low (1) - High (5).
- Advanced settings
- Verify threshold allows you to control how closely a fingerprint must match the User's saved fingerprint. This number can be set between 1 and 1000 – setting this too high means there is very little margin for error, but Users may find their attempts to use a fingerprint rejected more often than normal.
- Impressions allows you to set how many impressions are required when a User registers a fingerprint during Enrolment. An Impression is an individual 'scan' of the User's fingerprint, made by touching the fingerprint scanner.
- Sleep between impressions (ms) allows you to set how many milliseconds must pass between each impression is made on the fingerprint reader.
1.6 Prox Device Settings
The Prox device settings tab allows you to change several different options for clocking using a Prox device.
- Auto-detect clocking direction is a toggle that allows you to enable the T2 making assumptions on which way the User is clocking. For example, if their last clocking was a clock in, the T2 will assume the User is clocking out next time they scan their prox device. Enabling this setting means the User can clock with just a single swipe.
You can also input the individual settings of your Prox devices on this tab, defining the Sector number, Block number, Bade number offset, Badge number length, Encryption Key and Key class.
1.7 Faceprint Settings
The Faceprint settings tab allows you to configure the settings for capturing Faceprints.
Auto wake settings
- Wake on movement allows the T2 to leave its 'sleep' mode when it detects movement with its camera. The slider (or text box) allows you to control how much movement is needed to wake the device, giving you options from low (1) to high (5) – setting it to 'off' (0) means the T2 will need to be manually woken by touching the device.
- Detection Range is used to determine how close a User needs to be to the T2 to automatically wake it. Use the slider (or text box) to choose from near (1) to far (5).
Face ID settings
- Use Face ID by default will cause the T2 to automatically display the camera and viewfinder for clocking with a Faceprint when it wakes up and whenever it makes a clocking.
- Enable Face ID toggle clocking is a toggle that allows you to enable the T2 to make assumptions on which way the User is clocking. For example, if their last clocking was a clock in, the T2 will assume the User is clocking out next time the use a Faceprint to clock. Enabling this setting means the User can clock without needing to touch the T2 at all.
- Security Level - Use the slider (or text box) to change the Terminal’s security level between Low (1) - High (5).
- Detection Range is used to determine how close a User needs to be to the T2 to clock using a Faceprint. Use the slider (or text box) to choose from near (1) to far (5).
- Liveness Check allows you to enable a liveness check* when using Faceprint. You can choose to turn off Liveness Checks or choose how strong the check is. If you use a stronger test, the check will be more secure but will take longer, and vice versa.
*A liveness check is an optional piece of functionality when using a Faceprint. It prompts the User to rotate their face to the left or right when registering or using Faceprint. The check will help to ensure that the User is actually them, and not just a picture of them. Enabling the Liveness Check will help to limit spoofed clockings using a Faceprint. Without enabling a Liveness Check, Users may be able to clock on behalf of others by using a sufficiently high-quality image of someone else.
1.8 View Status
The View Status screen displays information regarding the terminal status and health, it will also indicate if a terminal is online/offline.
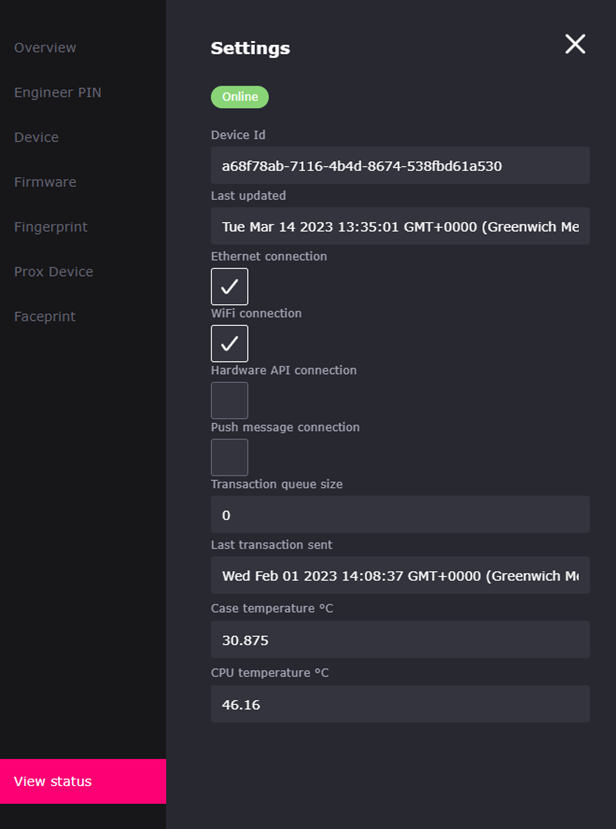
- Device Id – This will display the Unique Id for the selected device.
- Last updated – will display the date and time stamp that the device was last updated with the Advanced Device and Access manager portal.
- Ethernet, WiFi, Hardware API, Push Message Connections – indicates that the device has these connections active.
- Transaction queue size – If for any reason the terminal is not connected, the transaction queue size will be displayed.
- Last transaction sent – Date and time stamp of the last transaction sent from the device to the Advanced Device and Access Manager portal.
- Case and CPU temperature – Are displayed for diagnostic purposes in degrees centigrade.