Contents
Biometric - Faceprint Configuration

Faceprint configuration
The faceprint identification offers more configuration options, due to the variability in performance of cameras in different lighting conditions, different distances to faces, changing backgrounds, etc.
Waking the device
The first block of settings concern waking the device with a face – Auto wake settings. Use wake on movement to get the device to leave the screensaver and go to the home screen when it detects movement in front of it. 0 will disable waking on movement, otherwise increasing the value will require greater movement to wake the device.
Require a face for auto wake will require a face to be detected in the camera view for the device to wake up automatically – a useful option if the device is located in a busy place and is constantly waking up. Use Detection range to adjust how close the face must be for the device to wake up.
If you don’t want the device to wake up automatically at all, and instead require a touch of the screen to dismiss the screen saver, leave both Wake on movement and Require a face for auto wake disabled.
Face identification
The face identification can be configured, both to control when a face is detected, and the security settings.
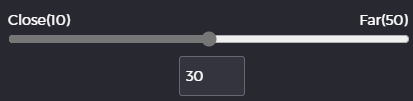
Use Detection range to choose how far away a face must be to be identified. Selecting Far will mean faces can be picked up while far away from the reader, while Close will require them to be much closer. Detecting faces far away may make the Smart biometric clock (T2) seem more responsive, but at the cost of increasing the risk of accidental clockings. This setting will increase the amount of data captured, which may also help in difficult lighting conditions, but at the cost of increasing processing requirements – face matches may take longer to process than when a closer setting is chosen.
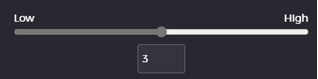
Use Security level to control the balance between ease of use and high accuracy – see the description above under Fingerprint configuration. See the Accuracy and performance section for details on the effects of different values chosen here.
Troubleshooting
If you find the device is failing to spot faces when they are presented, try increasing the value of Detection range to increase the amount of data available from the camera. If users are normally toggle clocking, try selecting Clock in or Clock out explicitly when testing this – you will see a box drawn around the face when it has been successfully located.
If you are experiencing issues with one user being identified as another, try selecting a higher security level. You can also try re-enrolling one or both affected employees. If the issue continues, consider using fingerprint or proximity cards for these employees.
Some users who change their appearance may encounter difficulties when using face identification, for example if they sometimes wear glasses or a face mask, or sometimes have a beard. In these cases we recommend enrolling multiple faces into the system so improve accuracy – for example, enrol both with and without glasses.
In general, if a user is experiencing problems clocking using their faceprint, re-enrolling the face of that user should be the first step.
Face liveness
The Smart biometric clock (T2) includes a system to reduce the chances of “fooling” the face recognition by using photos of other users. Turn this on using the Liveness check option in the portal.
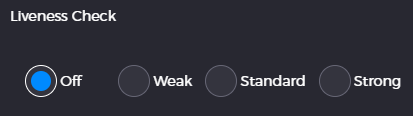
When it is enabled, users will be required to enrol both their normal “forwards” face, but also to look both left and right and capture data about their gaze directions. When subsequently clocking, they will be prompted randomly to look either left or right, and they must do so before the clocking will be accepted.
The level selected will affect how stringent the liveness check is. Weak will require the turning of the head, but is quick and easy to do – at the trade off of being easier to fool. On the other hand, Strong requires much more distinct head turns, which provides more robust detection of real faces, but takes longer and is a trickier process for the user to master.
Troubleshooting
Liveness checks will always result in users taking longer to clock – this may be a particular concern at busy terminals.
If you are finding users are failing to enrol or clock successfully when liveness is enabled, try guiding them through the process in person. They need to turn their head when prompted and hold it in position once turned. It can be tricky to get right the first time, but once they get used to the process they should be OK.
Enrolling and clocking is much easier on Weak than Strong – consider using lower values unless you have observed issues with the system being attacked using images of users.
Face liveness is designed to work with static photo attacks, it can not prevent users using either 3D face masks, or video streams. If you have concerns about users going to these lengths, consider using fingerprint.