Device and Access Manager
Terminal settings
Terminal settings
Terminal Overview
Engineer PIN
Firmware settings
Device Settings
Fingerprint settings
Faceprint Settings
Proximity Device Settings
Device status
Sites
Areas
Managing Terminals
Users
Tools
System Settings
User Groups Feature Overview and Setup
Clocking Analysis Feature
Moving a Terminal
Device Status Email Alerts
Smart Biometric Clock (T2) Device
Smart Biometric Clock (T2) User Enrolment
Smart biometric clock (T2) User Onboarding Screens
Enrolling Users on the Smart biometric clock (T2) for Fingerprint recognition
Additional devices
Turnstiles
Fire Alarm Interface
Weigand readers
Weigand overview
Weigand portal configuration
Connecting a Weigand reader to the T2
Wiegand 36-bit
Wiegand Generic
Wiegand Hexadecimal
Wiegand Alphanumeric
Testing Weigand cards on the T2
Fire alarm interface documentation – Web Portal, Smart biometric clock (T2) Firmware and Hardware
Barcode Readers
Smart biometric clock (T2) Factsheet
Smart Biometric Clock Installation Guide Video
Smart biometric clock (T2) Installation Guide
Smart biometric clock (T2) network requirements
Third-party proximity readers
Smart biometric clock (T2) Offline Troubleshooting
Smart biometric clock (T2) UPS Solution
Smart biometric clock (T2) UPS User Guide
Mobile Clocking Feature
Upgrading Device Firmware
Issue affecting Smart biometric clocks on Thursday 9th October 2025
Portal release documentation
Portal Release notes - 5th November 2025
Portal Release notes - 17th September 2025
Portal Release notes - 30th July 2025
Portal Release notes - 4th June 2025
Portal Release notes - 30th April 2025
Portal Release notes - 26th March 2025
Portal Release notes - 26th February 2025
Portal Release notes - 29th January 2025
Portal Release notes - 6th November 2024
Portal Release notes - 2nd October 2024
Portal Release notes - 21st August 2024
Portal Release notes - 25th July 2024
Portal Release notes - 22nd May 2024
Portal Release notes - 20th March 2024
Portal Release notes - 28th February 2024
Portal Release notes - 31st January 2024
Portal Release notes - 15th November 2023
Portal Release Notes - 11th October 2023
Portal Release notes - 9th August 2023
Portal Release notes - 12th July 2023
Portal Release notes - 14th June 2023
Portal Release notes - 17th May 2023
Portal Release notes - 18th April 2023
Portal Release notes - 22nd March 2023
Portal Release notes - 27th February 2023
Activities
Activities Feature Overview - Web Portal & Smart biometric clock (T2) Firmware
Activities Setup for Device and Access Manager
Activities on Smart biometric clock (T2) Terminals
Firmware release documentation
Firmware Release 2.12.0 - 19th November 2025
Firmware Release 2.11.0 30th July 2025
Firmware Release 2.10.0 - 4th June 2025
Firmware Release 2.9.0 - 30th April 2025
Firmware release 2.8.0 - 26th March 2025
Firmware release 2.7.0 - 29th January 2025
Firmware Release 2.6.0 - 2nd October 2024
Firmware Release 2.4.2 - 12th July 2024
Firmware Release 2.4.1 - 27th June 2024
Firmware Release 2.3.1 - 9th May 2024
Firmware Release 2.3.0 - 16th April 2024
Firmware Release 2.2.1 - 29th January 2024
Firmware Release 1.9.0 - 18th January 2024
Firmware Release 1.8.5 - 9th August 2023
Firmware Release 1.8.4 - 5th April 2023
Firmware Release 1.8.3 - 28th February 2023
Compliance
Biometrics
Biometric Overview
Smart biometric clock (T2) Biometrics - Enabling/Disabling biometrics
Biometrics - Fingerprint Configuration
Biometric - Faceprint Configuration
Biometric - Accuracy and performance
Biometric Data Retention Policy
Biometric FAQS
MF & AC Hardware Range
- All categories
- Smart Biometric Clock (T2) Device
- Smart Biometric Clock (T2) User Enrolment
- Smart biometric clock (T2) User Onboarding Screens
Smart biometric clock (T2) User Onboarding Screens

As part of the user onboarding journey for Smart biometric clock (T2) users, they can expect to be presented with the following screens as part of the device onboarding process.
These screens allow the user to identity where the data for face, finger and prox card is being captured at a Smart biometric clock (T2) when enrolling on the devices.
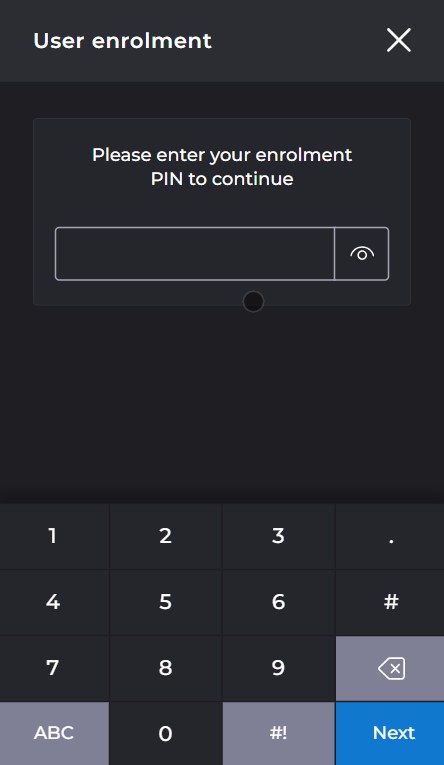
Figure 1: Smart biometric clock (T2) User PIN enrolment screen
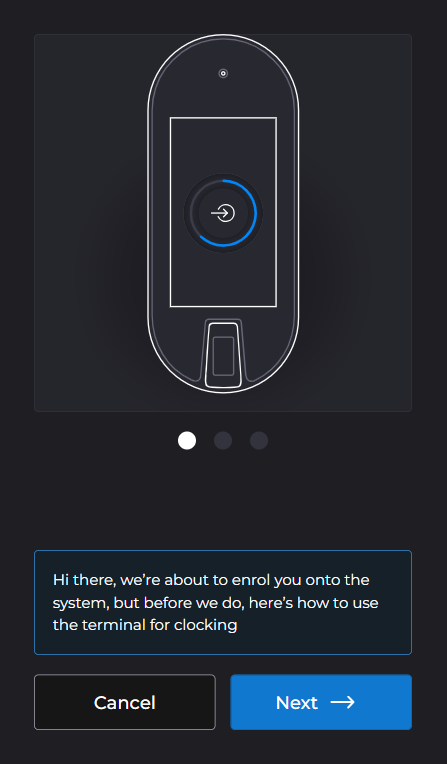
Figure 2: How to use the Smart biometric clock (T2) screen starting enrolment.
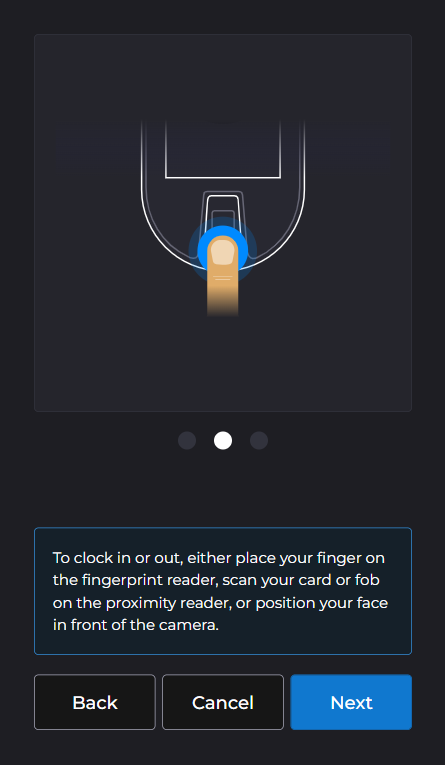
Figure 3: How to use the Smart biometric clock (T2) screen - Identify where to clock on a Smart biometric clock (T2) using biometrics.

Figure 4: How to use the Smart biometric clock (T2) screen - Identify where to clock on a Smart biometric clock (T2)using proximity card.
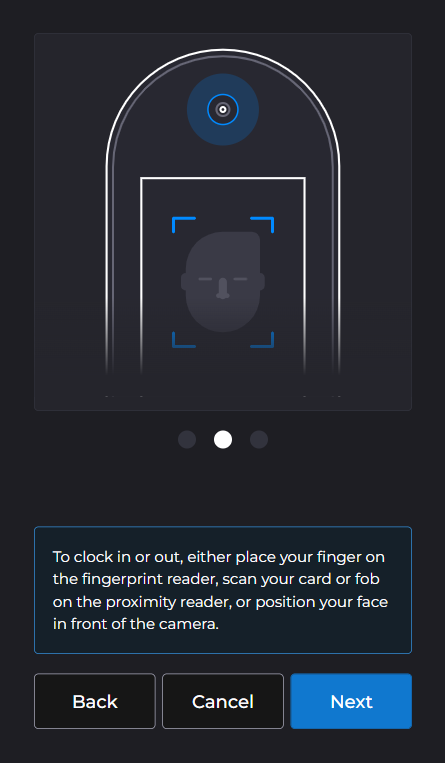
Figure 5: How to use the Smart biometric clock (T2) screen - Identify where to clock on a Smart biometric clock (T2) using facial recognition.

Figure 6: How to use the Smart biometric clock (T2) screen - example clocking confirmation message, how to identify the buttons to allow cancellation and to reverse the clocking directions.