Contents
Smart Biometric Clock turnstile setup

Smart Biometric Clock turnstile setup
Pre Requisites
To use a turnstile with the Smart Biometric Clock, you’ll need to ensure that
· Your Smart biometric clock (T2) is version 2 or later.
· Your Smart biometric clock (T2) will need Firmware version 2.11.0 or later.
· PeopleConnect version 20250725 or later is required.
· An access control backboard is installed. Note: Revision B cannot be used if the Smart Biometric Clock (T2) is powered over PoE
· If access is required in both directions on a turnstile, two Smart Biometric clocks will be required for either side of the turnstile.
Please contact your account manager if you’re unsure or need to order new hardware.
Installation
Follow the normal installation guide for the Smart Biometric Clock here. Ensure the access control board is installed in the mounting bracket.
To wire up the Smart Biometric Clock to the turnstile, follow the wiring diagram below.
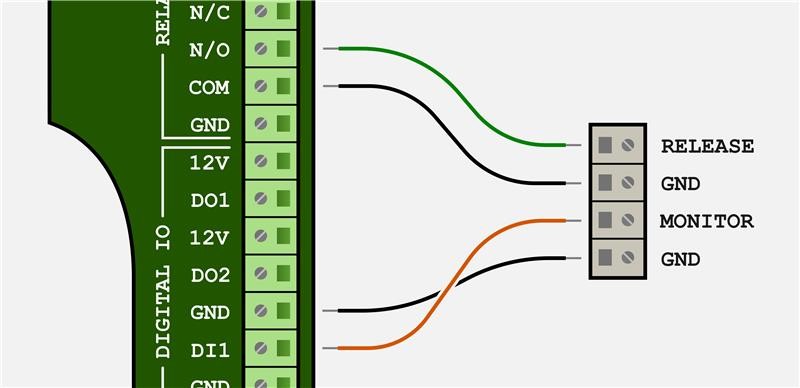
Smart Biometric Clock | Turnstile |
N/O | RELEASE |
COM | GND |
DI1 | MONITOR |
GND | GND |
This diagram shows wiring to a turnstile that includes a sensor for monitoring rotation of the turnstile. If your turnstile does not include this feature, or you do not wish to use it, the wires to DI1 and the second GND can be left off.
Note that the diagram shows a revision E backboard – locations of connectors on earlier revisions will vary.
The Smart Biometric Clock can now be mounted onto the wall bracket and powered on.
Configuration
When the Smart Biometric Clock has started up, register it as usual using the Engineer PIN. Once you are presented with the home screen, choose Settings and enter your Engineer PIN again. On the engineer login screen, again select Settings, followed by Access Control on the settings screen.

You will be presented with a screen showing your current access control configuration – which will be empty unless you’ve previously added a device.
Select Add new device to begin the process of adding a turnstile.
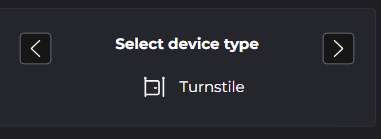
On the following screen you can choose which device type to add. Choose Turnstile and press Select at the bottom of the screen.
Now you will be prompted to configure the turnstile, using the screen below.
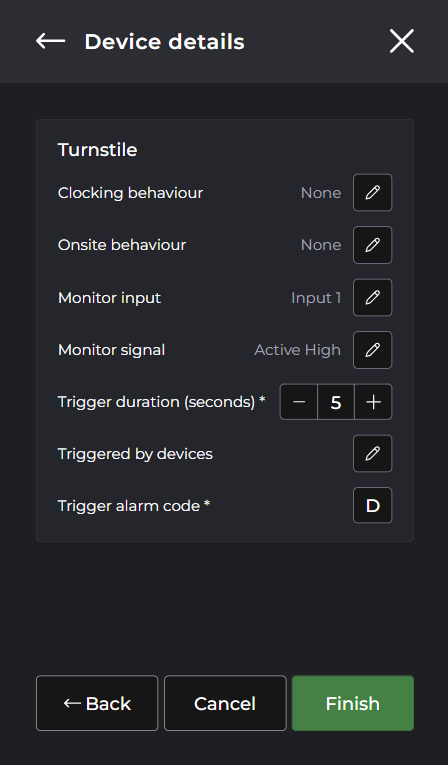
The options are:
Clocking behaviour
Should a clocking be recorded when using the turnstile? Options are None, Clock in and Clock out.
Onsite behaviour
Should the employee’s onsite status be updated when using the turnstile? Options are None, Onsite and Offsite.
Monitor input
Which digital input on the backboard is the monitor line connected to? Options are Unused, Input 1 and Input 2.
This is a digital input to the backboard to indicate when the turnstile has rotated, there are various names for this: turnstile rotation, transaction complete etc.
Monitor signal
When it is triggered, what state does the monitor line change to? Options are Unused, Active high and Active low.
Trigger duration
How long should the turnstile be triggered for when it is opened? Measured in seconds, the default of 5 seconds means a user will have 5 seconds to rotate the turnstile before it locks again. If the monitor input is not triggered within the turnstile trigger duration, no transaction will be generated.
Note that some turnstiles control the open duration themselves, rather than depending on the signal. In this case, you can configure 0 seconds as the duration here and configure the actual timing using the settings on the turnstile.
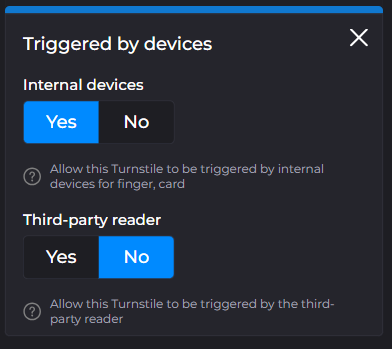
Trigger by devices
Which devices can be used to trigger the turnstile to open? Options are Internal devices and any external input devices you have attached – such as card readers, or fire alarm interface units. Select Yes for devices you wish to cause the turnstile to open when used successfully.
Trigger alarm code
Which alarm code should be raised if the turnstile is forced open while locked? Only applicable if a monitor input is connected.
When complete, press Finish to save the turnstile.
Testing the turnstile
After the turnstile has been saved, you have the option to enter test mode to check the turnstile is behaving as expected.
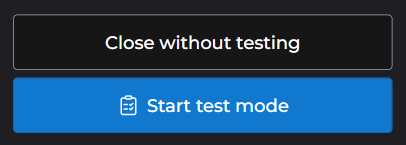
After pressing Start test mode you will be shown another screen, explaining that the turnstile is about to be locked to test the connection. When you are ready, press Proceed.
The device will attempt to lock the turnstile and then ask you if it is now locked.
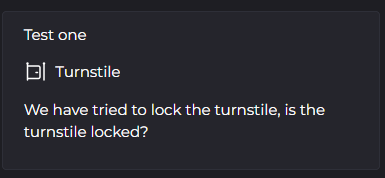
Check the turnstile, then choose Yes or No to answer the question.
The device will now attempt to unlock the turnstile and again ask you to check. When you have checked, again choose Yes or No.
If both tests were successful, you’ll be shown a Test successful screen and the process of adding the turnstile is complete. If either was unsuccessful, you’ll be prompted to check the wiring and the settings of the turnstile before trying again.
Reader mode
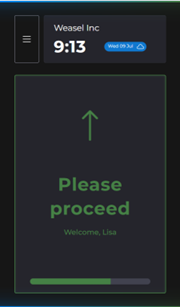
When you return to the home screen after adding a turnstile, the device will be in Reader mode. Instead of the normal clock in and clock out buttons, an animated display will show the options available to gain access through the turnstile.
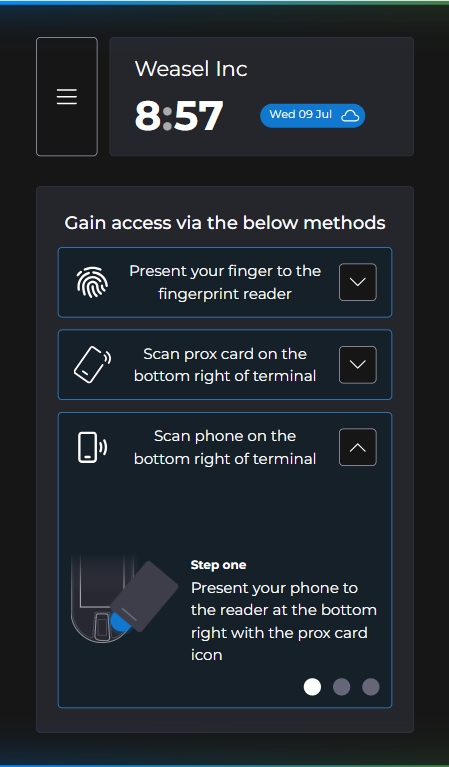
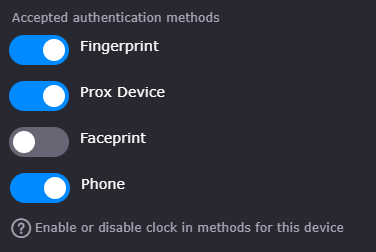
The options displayed will correspond to the authentication methods selected on the portal for this device – add or remove authentication methods there to customise the screen.
Present a valid form of authentication to unlock the turnstile. The turnstile will be unlocked for the number of seconds you configured it for, or until it has been rotated if there is a monitor line configured.
If you configured the turnstile to send a clocking and with a monitor line, the clocking will be sent once the turnstile has rotated. Otherwise with no monitor line it will be sent immediately when the turnstile is unlocked.
User groups
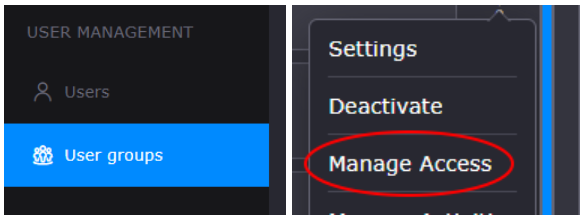
To restrict which users are allowed through the turnstile, configure user groups for this device in the web portal.
Select the User groups menu item in the portal to configure the available groups, then Manage access for your device and follow the instructions.
See the user groups documentation here for more detail.