Device and Access Manager
Terminal settings
Terminal settings
Terminal Overview
Engineer PIN
Firmware settings
Device Settings
Fingerprint settings
Faceprint Settings
Proximity Device Settings
Device status
Sites
Areas
Managing Terminals
Users
Tools
System Settings
User Groups Feature Overview and Setup
Clocking Analysis Feature
Moving a Terminal
Device Status Email Alerts
Smart Biometric Clock (T2) Device
Smart Biometric Clock (T2) User Enrolment
Smart biometric clock (T2) User Onboarding Screens
Enrolling Users on the Smart biometric clock (T2) for Fingerprint recognition
Additional devices
Turnstiles
Fire Alarm Interface
Weigand readers
Weigand overview
Weigand portal configuration
Connecting a Weigand reader to the T2
Wiegand 36-bit
Wiegand Generic
Wiegand Hexadecimal
Wiegand Alphanumeric
Testing Weigand cards on the T2
Fire alarm interface documentation – Web Portal, Smart biometric clock (T2) Firmware and Hardware
Barcode Readers
Smart biometric clock (T2) Factsheet
Smart Biometric Clock Installation Guide Video
Smart biometric clock (T2) Installation Guide
Smart biometric clock (T2) network requirements
Third-party proximity readers
Smart biometric clock (T2) Offline Troubleshooting
Smart biometric clock (T2) UPS Solution
Smart biometric clock (T2) UPS User Guide
Mobile Clocking Feature
Upgrading Device Firmware
Issue affecting Smart biometric clocks on Thursday 9th October 2025
Portal release documentation
Portal Release notes - 5th November 2025
Portal Release notes - 17th September 2025
Portal Release notes - 30th July 2025
Portal Release notes - 4th June 2025
Portal Release notes - 30th April 2025
Portal Release notes - 26th March 2025
Portal Release notes - 26th February 2025
Portal Release notes - 29th January 2025
Portal Release notes - 6th November 2024
Portal Release notes - 2nd October 2024
Portal Release notes - 21st August 2024
Portal Release notes - 25th July 2024
Portal Release notes - 22nd May 2024
Portal Release notes - 20th March 2024
Portal Release notes - 28th February 2024
Portal Release notes - 31st January 2024
Portal Release notes - 15th November 2023
Portal Release Notes - 11th October 2023
Portal Release notes - 9th August 2023
Portal Release notes - 12th July 2023
Portal Release notes - 14th June 2023
Portal Release notes - 17th May 2023
Portal Release notes - 18th April 2023
Portal Release notes - 22nd March 2023
Portal Release notes - 27th February 2023
Activities
Activities Feature Overview - Web Portal & Smart biometric clock (T2) Firmware
Activities Setup for Device and Access Manager
Activities on Smart biometric clock (T2) Terminals
Firmware release documentation
Firmware Release 2.12.0 - 19th November 2025
Firmware Release 2.11.0 30th July 2025
Firmware Release 2.10.0 - 4th June 2025
Firmware Release 2.9.0 - 30th April 2025
Firmware release 2.8.0 - 26th March 2025
Firmware release 2.7.0 - 29th January 2025
Firmware Release 2.6.0 - 2nd October 2024
Firmware Release 2.4.2 - 12th July 2024
Firmware Release 2.4.1 - 27th June 2024
Firmware Release 2.3.1 - 9th May 2024
Firmware Release 2.3.0 - 16th April 2024
Firmware Release 2.2.1 - 29th January 2024
Firmware Release 1.9.0 - 18th January 2024
Firmware Release 1.8.5 - 9th August 2023
Firmware Release 1.8.4 - 5th April 2023
Firmware Release 1.8.3 - 28th February 2023
Compliance
Biometrics
Biometric Overview
Smart biometric clock (T2) Biometrics - Enabling/Disabling biometrics
Biometrics - Fingerprint Configuration
Biometric - Faceprint Configuration
Biometric - Accuracy and performance
Biometric Data Retention Policy
Biometric FAQS
MF & AC Hardware Range
- All categories
- Smart Biometric Clock (T2) Device
- Third-party proximity readers
Third-party proximity readers

Supported devices
For now, the reader we support is the Third Millennium RX480PLUS.
This reader should work out of the box with HITAG cards. It can also be used for MIFARE cards, although we'd recommend using the internal reader in the Smart biometric clock (T2) for these where possible, as the internal reader can be configured centrally using the Device and Access Manager web portal, instead of needing a configuration card.
Other readers outputting data in the same format should work, but without prior arrangement these devices are not officially supported.
If external readers are in use the Smart biometric clock (T2) must be powered using the Mains DC Adaptor.
Smart biometric clock (T2) Version 2 hardware connections
If the Smart biometric clock (T2) attaches to the wall using a plastic bracket, it is a Smart biometric clock (T2) Version 2. You will need an access control board to be fitted into the wall bracket. This is a small circuit board that connects to the main body of the Smart biometric clock (T2) via a ribbon cable and provides a selection of connections for access control peripherals, including for a third-party reader.
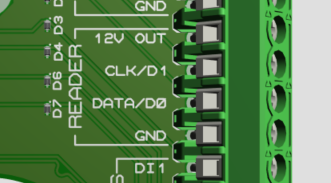
Connect the third-party reader cable to the connections marked "Reader" on the access control board, according to the below connections:
Smart biometric clock (T2) | RX480PLUS | Recommended cable colour |
12V OUT | +Vdc | Red |
CLK/D1 | DATA1/CLK | White |
DATA/D0 | DATA0/DATA | Green |
GND | 0V | Black |
Smart biometric clock (T2) Version 1 hardware connections
You'll need to make sure a jumper is in place to set the reader power to 5V for the RX480PLUS (the "Power" option on the sticker, highlighted below).
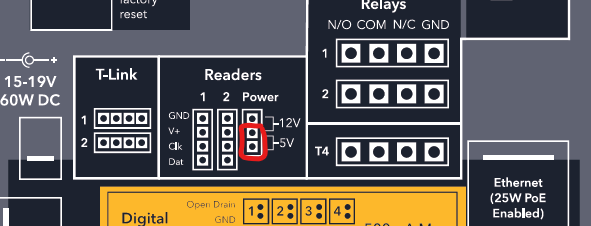
The third party reader should be connected to either Reader 1 or Reader 2 on the back of the Smart biometric clock (T2)
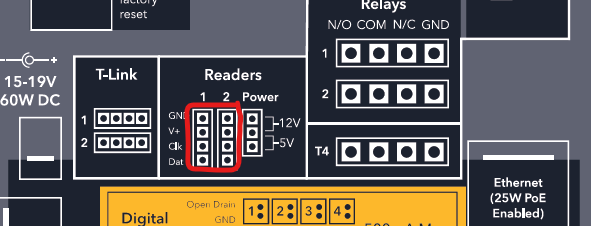
A pre-crimped cable that connects to the Smart biometric clock (T2) will be supplied either in the box or by the installation engineer. We supply it at fairly short length, leaving it to the installation engineer to attach to longer cable of the right length on site.
The cable should be connected as:
Smart biometric clock (T2) | Cable | RX480PLUS |
GND | Black | 0V |
V+ | Red | +Vdc |
Clk | White | DATA1/CLK |
Dat | Green | DATA0/DATA |
Configuration
Badge format
Badges come through as 13 characters from the Third Millennium RX480PLUS. So make sure the badge format is 13 characters long, or you'll lose the end of the badge.
Badge format is defined as a combination of * for the characters to keep, and ? for the characters to discard. For example, use ???????****** to discard the first 7 characters and use the final 6 characters as the badge number.